While working on your PC, taking screenshots can be necessary at times. After taking screenshots you can save them in image file formats. Now, this can be done in many ways. You can use the laptop screenshot key or resort to using specific software applications. This functionality is there for people using Macs and Windows laptops/PCs.
Here, we have listed the ways to take screenshots on a laptop running on various operating systems easily.
How to take screenshots on laptops running Windows 10/ 11
You can use many ways to take screenshots on PCs running Windows 10/ 11 and 7.
- Take a screenshot using an app
Both Windows 7 and 10 have a ‘Snipping Tool‘ for screenshot capture. It grabs a screenshot and then saves it in image format.
To use it, browse to Start Menu> Snipping Tool.
In the tool, you get options like New, Mode, Cancel Delay, etc.
Explore the options to set parameters for screenshot window capture.
2. Use the ‘PrtScn‘ key to take a screenshot
After pressing the key on the keyboard, you can paste the saved snapshot into Microsoft Word or Paint. Save it in an image format.
3. Capture a screenshot with Alt+PrtScn
Use these key combos as a shortcut key for screenshots on a laptop. It takes screenshots of only the device’s active window though. Then you can paste the image into another program.
4. Using Windows key+Shift+S
When you want to capture a section of the screen, use this laptop screenshot shortcut. As you use the keypress combo, the screen is dimmed and the Snip and Sketch tool is launched. Now drag the area you want to be saved as a screenshot. Paste the image into Paint or Word.
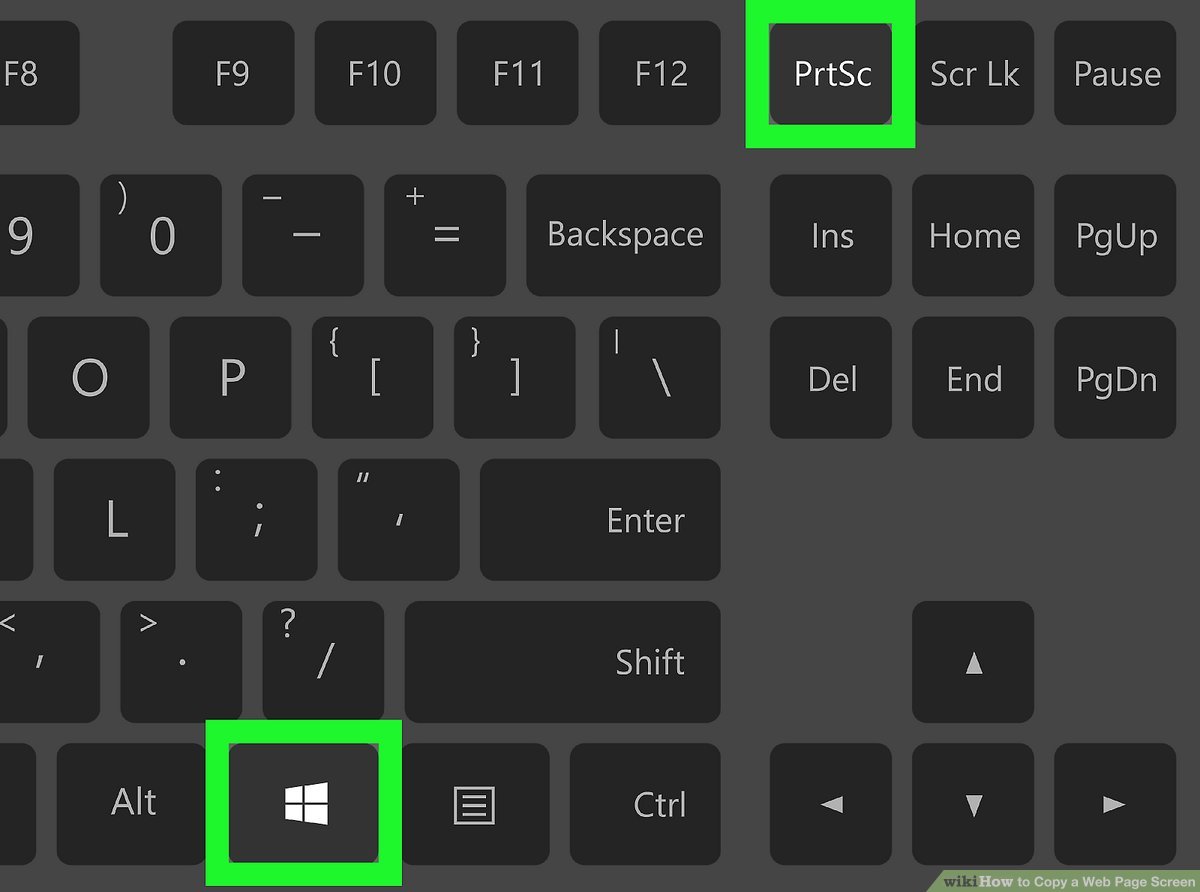
5. Using Windows key+PrtScn
Use this keypress combo to save the screenshot as an image file. It will get saved in the PC’s “Pictures” folder.
6. Using Windows key+G
This screenshot option is meant for gamers. This shortcut lets you save a game overlay. Then you have to press the Windows key + Alt + PrtScn to save the screenshot.
7. Using Snipping Tool to handle PrtScn
Go to settings on a Windows 10/11 PC. Type ‘print screen’ in the search bar. Then, select the ‘Use the Print Screen button to open screen snipping’ and activate the option.
How to take screenshots on macOS laptops/ PCs
Mac OS comes with screenshot-taking options too.
- Command+Shift+3
Just press these three keys at the same time and it will take a screenshot instantly.
2. Command+Shift+4
Through this method, you can save a section of the screen. It makes the cursor into a crosshair, enabling you to drag and select the portion.
You can also use the space bar to highlight the section you want to capture.
3. Command+Shift+5
With this combo, you get better control over the screenshot.
You get a box to adjust the screenshot properties. You may capture a section of the screen or the entire display area. You get video-recording buttons and timers for screenshots as well.
4. Command+Shift+6
This option is for users with a MacBook version having a Touch Bar. Typically, screenshots taken on MacOS PCs are stored on the desktop. You can specify a new location by using Command-Shift-5 –> Options> save location.
Also Read: मोदी सरकार छात्रो को फ्री में दे रही है लैपटॉप, जानिए क्या है सरकार के इस गारंटी की सच्चाई
Follow our WhatsApp channel for the latest news and updates